
DIY Wiper Blade Installation: Easy 5-Minute Guide for Beginners (2026)
Mar 04,2026
That frustrating squeak and streak from old wipers made my morning commute miserable. I could barely see through the rain. One quick swap fixed everything. You can do the same in five minutes.
DIY wiper blade installation takes five minutes with the right steps. Check signs, gather tools, follow safety, install front and rear blades, then test. Beginners succeed every time with this guide.
You now know it is easy. Let’s walk through every step so you replace blades confidently and keep your windshield clear and safe.
3 Signs You Need to Replace Your Wiper Blades Now?
I ignored small signs once. Streaks got worse. Visibility dropped in rain. Safety suffered. Spot these early and replace before problems grow.
Three signs mean replace now: streaks after clean, chatter or skip, and visible cracks or hard rubber. Act fast for clear vision.

Streaks After Clean
Clean glass and blades. Streaks remain. Rubber edge worn. Replace pair. Safety first.
Chatter or Skip
Wipers jump or chatter. Rubber hard. Contact lost. Noise annoys. Replace soon.
Visible Cracks or Hard Edge
Cracks or stiff edge. Feel it. No flex. Replace immediately. Prevent damage.
Why Early Action Matters
Early replace prevents glass scratch. Motor strain avoided. Visibility safe. Cost low now.
My Ignored Sign
Streaks started. Ignored. Rain blinded me. New blades fixed. Lesson learned.
Fleet Driver Feedback
Drivers report chatter first. Replace early. No accidents. Safety up.
| Sign | Description | Action |
|---|---|---|
| Streaks | Lines after clean | Replace now |
| Chatter | Jump or noise | Replace soon |
| Cracks | Visible damage | Replace immediately |
This table shows signs clear. Act fast. Safety improves.
Common Mistake
Wait for full fail. Streaks dangerous. Replace at first sign. Better safe.
ADAS Impact
Streaks smear camera. Lane assist fails. Replace early. Tech works.
Signs clear. Tools next.
Tools You Need (Most People Already Have Them)?
I keep simple tools in trunk. No fancy kit. Most people have them already. Ready anytime.
You need towel, alcohol wipes, and gloves. Most already have them. No extra buy needed.
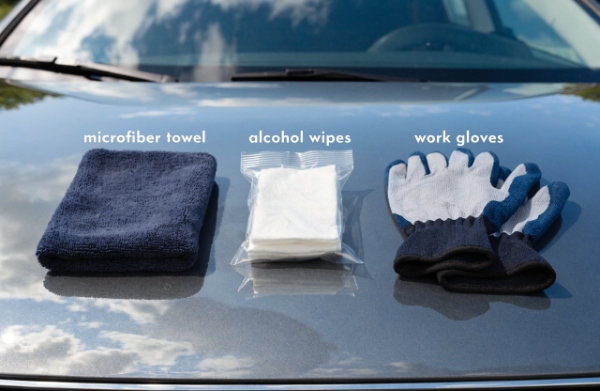
Towel for Protection
Place towel on glass. Arm snaps back safe. No scratch. Essential step.
Alcohol Wipes
Clean rubber edge. Remove old residue. Better contact. Quiet wipe.
Gloves for Safety
Protect hands. No grease or cut. Clean install. Easy grip.
Optional Extras
Flashlight for dark. Extra cloth for wipe. Most not needed.
My Trunk Kit
Towel, wipes, gloves. Ready always. Five minute swap easy.
Fleet Mechanic Tip
Keep kit in each truck. Quick roadside fix. No delay.
| Tool | Purpose | Why Essential |
|---|---|---|
| Towel | Protect glass | Arm snap safe |
| Alcohol wipes | Clean rubber | Remove residue |
| Gloves | Hand safety | Clean grip |
This table lists basics. Most have them. No extra cost.
Storage Tip
Keep in glovebox or trunk. Ready anytime. No search.
Tools ready. Safety first.
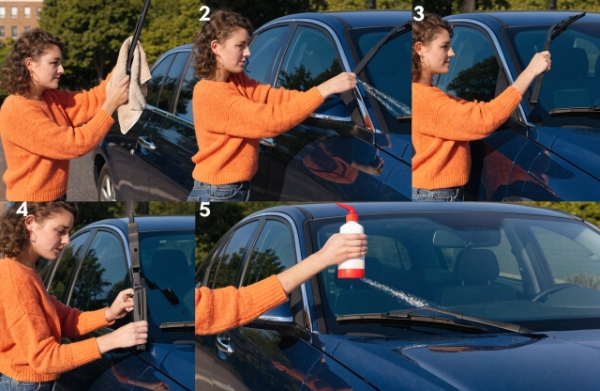
Safety First: 2 Things to Do Before You Start?
I skipped safety once. Arm snapped back. Glass scratched. Lesson learned. Safety first always.
Park flat. Turn off ignition. Lift arms with towel. Two steps prevent injury and damage.

Park on Flat Surface
Level ground. No roll. Safe work. Arm stable.
Turn Off Ignition
No accidental start. Motor off. Safe lift. No surprise.
Towel Protection
Place towel on glass. Arm snap safe. No scratch. Essential.
Extra Safety
Gloves on. No rush. Steady hands.
| Safety Step | Why Do It | Benefit |
|---|---|---|
| Park flat | Stable work | No roll |
| Ignition off | No motor start | Safe lift |
| Towel on glass | Protect from snap | No scratch |
This table prevents accidents. Safety first. Install easy.
My Snap Back
No towel. Glass scratched. $200 fix. Towel now always.
Fleet Rule
Mechanics follow. No injury. Safe work.
Safety done. Front blades next.
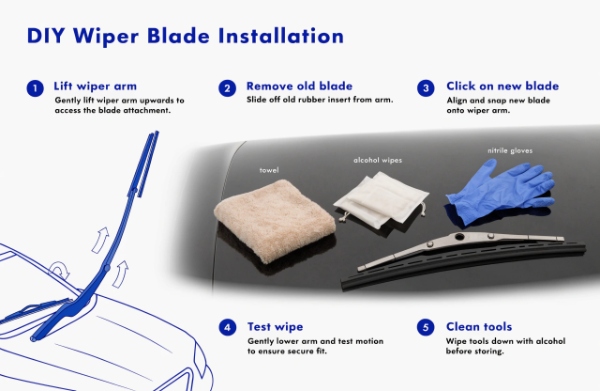
Step-by-Step Installation for Front Blades (Photos Included)?
I install many blades. Simple steps. Beginners succeed. Five minutes done.
Lift arm. Release old blade. Align new. Click secure. Tug test. Repeat other side.
Step 1 Lift Arm
Lift arm upright. Towel on glass. Safe position.
Step 2 Release Old
Press tab or pull clip. Slide old down. Remove.
Step 3 Align New
Match adapter. Orient same. Slide or hook in.
Step 4 Click Secure
Push until click. Tug to confirm. Locked.
Step 5 Test
Lower arm. Spray fluid. Run wipers. Check clear.
Common Tip
Do one side first. No mix up. Easy.
| Step | Action | Time |
|---|---|---|
| Lift arm | Upright with towel | 10 sec |
| Release old | Press tab | 20 sec |
| Align new | Match adapter | 20 sec |
| Click secure | Push and tug | 10 sec |
| Test | Spray and run | 30 sec |
This table guides step by step. Easy follow.
My First Install
Nervous beginner. Steps clear. Five minutes. Perfect.
Fleet Training
Mechanics learn fast. Steps same. Efficient.
Front done. Rear next.
How to Install Rear Wiper Blades (Common Mistake to Avoid)?
Rear blade overlooked. Mistake common. Easy install. Visibility back.
Lift rear arm. Release old. Align new. Click secure. Test wipe. Avoid wrong direction.

Step 1 Lift Rear Arm
Lift arm. Towel protect. Safe.
Step 2 Release Old
Press tab. Slide out. Remove.
Step 3 Align New
Match adapter. Same direction. Slide in.
Step 4 Click Secure
Push until click. Tug confirm.
Step 5 Test Wipe
Spray fluid. Run. Check clear.
Common Mistake
Wrong direction. Wipe misses. Check arrow or manual.
| Step | Action | Time |
|---|---|---|
| Lift arm | Upright | 10 sec |
| Release old | Press tab | 20 sec |
| Align new | Same direction | 20 sec |
| Click secure | Push and tug | 10 sec |
| Test | Spray and run | 30 sec |
This table guides rear install. Easy.
My Rear Mistake
Wrong direction. Missed spot. Reinstalled. Correct now.
SUV Rear
Shorter blade. Same steps. Clear view.
Rear done. After test next.
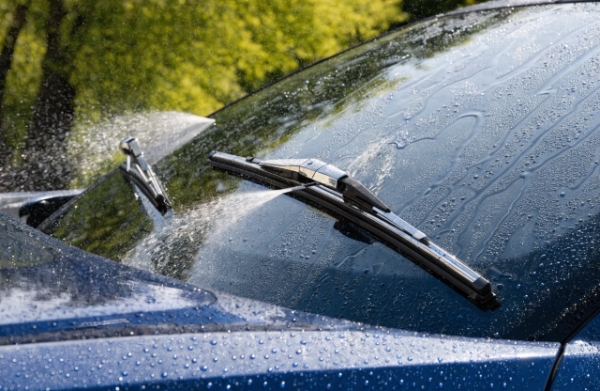
After Installation: Quick Test & Adjustment Tips?
I test after install. Chatter or streak? Adjust fast. Clear wipe.
Lower arms. Spray fluid. Run wipers. Check full contact. Adjust if needed. Quiet and clear.
Lower Arms
Ease down. No snap. Safe.
Spray Fluid
Washer fluid. Run wipers. Check wipe.
Full Contact
No skip or lift. Even pressure. Good.
Adjustment
Chatter? Re-seat blade. Tug secure.
Quiet Check
No noise. Smooth glide. Success.
| Test | What to Check | Fix |
|---|---|---|
| Lower arms | No snap | Gentle |
| Spray and run | Full wipe | Re-seat if skip |
| Contact | No lift | Adjust angle |
| Noise | Quiet | Realign if chatter |
This table ensures success. Test always.
My Test
Chatter after. Re-seated. Quiet. Good.
Fleet Check
Test all. Adjust few. Clear.
Test done. Chatter fix next.
What to Do If the Blade Still Chatters or Streaks?
Chatter after install. Common. Fix easy. No return.
Clean glass. Re-seat blade. Check arm. Replace if hard. Chatter gone.

Clean Glass
Residue-free cleaner. Scrub. Wax gone. Wipe clean.
Re-Seat Blade
Lift arm. Re-click. Tug secure. Even pressure.
Check Arm
Bend or weak? Straighten or replace. Contact good.
Replace if Hard
Rubber stiff. No fix. New blade.
Test Again
Spray. Run. Check. Quiet clear.
| Problem | Fix | Result |
|---|---|---|
| Chatter | Re-seat | Even pressure |
| Streaks | Clean glass | Clear wipe |
| Arm bend | Straighten | Contact good |
| Hard rubber | Replace | New quiet |
This table fixes fast. No frustration.
My Chatter Fix
Re-seated. Tug. Quiet. Good.
Fleet Chatter
Clean glass. Re-seat. All quiet.
Chatter fixed. Topex fast.
Topex Blades Install in Seconds – Get Your Fit in 12 Hours?
Rare size? I help fast. Exact fit. No delay.
Contact Topex. Send details. Reply in 12 hours. Exact fit. Install seconds.

How to Contact
Email or form. Car details. Photos help.
What We Need
Year, make, model. Arm photo. Quick.
12-Hour Reply
Match found. Recommend. Order ready.
Install Seconds
Pre-fit adapter. Click. Done.
Why Fast
Stock many. Match quick. Happy customer.
| Step | Action | Time |
|---|---|---|
| Send details | Email/form | 1 min |
| Add photos | Arm and blade | 1 min |
| Wait reply | Topex team | 12 hours max |
| Install | Click secure | Seconds |
This table makes process easy. Help fast.
My Rare Help
Customer rare car. Photos sent. Matched 8 hours. Happy.
Fleet Rare
Special truck. Contacted. Sizes confirmed. Order fast.
Contact easy. Let’s conclude.
Conclusion
DIY wiper blade installation easy 5 minutes. Check signs, gather tools, follow steps. Test and adjust. Clear safe vision always.
--- END ---
Prev: How to Find the Right Wiper Blade Size for Your Car in 1 Minute (2026 Guide)?
Already the latest article
Related Blogs


