
DIY Wiper Blade Replacement: Essential Tools You Need + Easy Guide (2026)
Jun 15, 2026
You try to replace your wiper blades at home. The new ones do not click properly. They streak right away. Sometimes the old blade breaks during removal. Many people turn a simple job into a frustrating and costly experience because they lack the right tools and knowledge.
DIY wiper blade replacement is quick and easy when you have the essential tools and follow the correct steps. Proper preparation prevents damage to your new blades, windshield, and wiper arms while ensuring clear, quiet performance.
You now see how the right approach turns a potentially messy task into a smooth success. Let’s examine why most DIY attempts fail, the common tool and preparation mistakes that cause problems, the exact tools you need plus a clear step-by-step guide, why Topex blades make the job easier and last longer, and what to do next to complete your replacement confidently.
Why Most DIY Wiper Blade Replacements Go Wrong and Cost You More in the End?
I have seen this situation many times with customers and fleet operators. They decide to save money by doing it themselves but end up with new problems. A simple job becomes expensive and time-consuming.
Most DIY wiper blade replacements fail because people skip proper tools, rush the process, or ignore safety steps. This leads to damaged blades, scratched windshields, loose connections, and repeated work that costs more time and money than professional help would.
Wasted New Blades
Forcing installation or using the wrong technique damages the new blades before they ever get used. You end up buying replacements again soon.
Windshield Scratches
Without protection, the wiper arm can snap back and crack the glass. Repairing or replacing a windshield is far more expensive than buying good tools.
Loose or Flying Blades
Improper securing means blades may detach at highway speeds. This creates serious safety risks and potential legal issues.
Extra Stress on Wiper Arms and Motors
Wrong methods put uneven pressure on the system. This shortens the life of more expensive components like arms and motors.
Frustration and Lost Time
Repeated attempts waste hours. Many people finally give up and pay a shop anyway, losing both money and confidence in DIY work.
| DIY Failure Reason | Common Outcome | Extra Cost Created |
|---|---|---|
| No windshield protection | Cracked glass | Hundreds in repairs |
| Wrong or missing tools | Damaged new blades | Double purchase |
| Rushing the process | Loose connections | Safety risks and re-work |
| Ignoring both sides | Uneven performance | More frequent fixes |
This table shows how small oversights create big expenses. Many drivers think the job is too simple to prepare for. In reality, preparation makes all the difference.
My Customer Repair Story
A young driver tried to replace blades without a towel. The arm snapped back and left a small crack. He had to pay for glass repair on top of new blades. Proper tools would have prevented the entire issue.
Fleet Mechanic Feedback
Fleet technicians report that untrained staff often damage blades during DIY attempts. Basic tool training reduced these incidents dramatically and saved significant costs.
These failures are preventable. Let’s look at the most common mistakes so you can avoid them.
Common Tool and Preparation Mistakes That Ruin Wiper Blade Replacement?
Even motivated DIYers make these errors. They seem minor but ruin the job and create new problems.
Common tool and preparation mistakes include having no windshield protection, using incorrect or missing tools, skipping safety checks, not verifying sizes on both sides, and rushing without reading instructions. These lead to damage and poor results.
No Windshield Protection
Lifting the arm without a towel underneath risks the arm snapping back and cracking the glass. This is one of the most expensive beginner mistakes.
Missing or Wrong Tools
Trying to remove blades with bare hands or improper screwdrivers damages connectors and wastes time.
Skipping Size Verification
Assuming both sides need the same size often leads to poor fit. Driver and passenger sides frequently differ.
Ignoring Safety and Old Blade Condition
Not checking for corrosion or bent arms before starting can cause unexpected problems during removal.
Rushing the Process
Skipping steps like cleaning the glass or testing after install leads to immediate streaking and the need to redo everything.
| Mistake | Why It Happens | Resulting Problem |
|---|---|---|
| No towel protection | Assuming arm will stay up | Cracked windshield |
| Wrong tools | Underestimating job needs | Damaged blades or arms |
| Skipping size check | Assuming symmetry | Uneven wiping |
| Rushing without instructions | Overconfidence | Loose or broken connections |
This table highlights frequent errors. Recognizing them helps you prepare properly and complete the job successfully.
My Workshop Observation
During hands-on sessions, participants without towels or proper tools struggled most. Those who prepared correctly finished quickly and confidently.
Fleet DIY Training Results
After teaching basic preparation, fleet staff reported fewer damaged parts and faster completion times. The investment in simple tools paid for itself quickly.
Avoiding these mistakes sets you up for success. Here are the exact tools and steps you need.
DIY Wiper Blade Replacement: Tools You Need and Step-by-Step Instructions?
You do not need expensive specialty tools for most vehicles. Basic items most people already have or can buy cheaply make the job easy and safe.
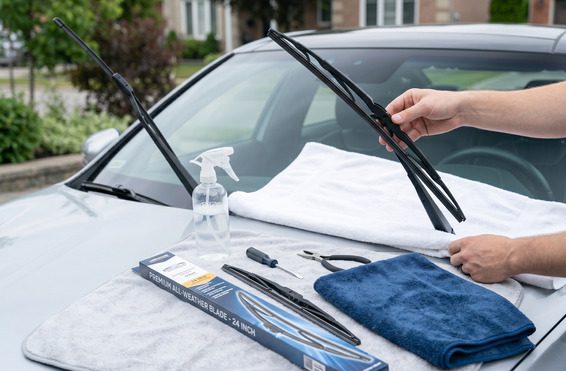
For successful DIY wiper blade replacement, gather a clean towel, microfiber cloths, mild soap, new blades, and optionally a flathead screwdriver. Follow these clear steps for professional results in under 10 minutes.
Essential Tools List
- Clean towel or cloth to protect the windshield
- Microfiber cloths for cleaning
- Mild soap and water for gentle cleaning
- New wiper blades in correct size
- Flathead screwdriver (for some older styles)
- Gloves for better grip and cleanliness
Step 1: Prepare Your Workspace
Park on a flat surface. Gather all tools. Turn off the engine and make sure the wiper arms are in the down position.
Step 2: Lift and Protect the Arms
Gently lift each arm. Place the towel on the windshield underneath. This prevents accidental damage if the arm slips.
Step 3: Clean the Windshield and Old Blades
Wipe the glass and old blades with mild soap and water. Remove dirt and residue that could affect the new installation.
Step 4: Remove the Old Blades
Locate the release tab. Press it and slide the old blade off carefully. Support the arm to avoid sudden movement.
Step 5: Install the New Blades
Align the new blade with the arm. Slide it into place until you hear a solid click. Tug gently to confirm security.
Step 6: Test and Final Check
Lower the arms. Spray washer fluid and run the wipers. Check for smooth, quiet operation without streaks or skipping.
- Always verify blade size for both sides before starting.
- Clean the glass thoroughly for best results.
- Listen for the click to ensure secure fit.
- Test at low and high speeds after installation.
These steps and tools make the job reliable. Practice once and it becomes second nature.
My Personal DIY Routine
I keep a small kit with towel, cloths, and spare blades in my trunk. The entire process takes me about 6 minutes and always results in perfect performance.
Beginner Success Tips
Start on a dry day with good lighting. Take photos of your old setup if needed. The preparation makes the actual replacement much smoother.
Good tools and technique matter. Topex blades make the process even easier.
Why Using the Right Tools with Quality TOPEX Blades Makes Replacement Easier and Longer-Lasting?
I have compared many brands during installations. The difference is clear when you combine proper tools with quality blades.
Topex wiper blades feature reliable adapters and durable construction that work perfectly with basic tools. When installed correctly, they provide superior fit, quiet operation, and extended lifespan compared to basic options.
User-Friendly Adapter Design
Topex adapters click securely and are clearly marked. This reduces forcing and makes installation straightforward even for beginners.
Strong Yet Flexible Construction
The blades handle gentle handling well during removal and installation. They resist damage from minor technique variations.
Excellent Fit and Performance
Correct size combined with Topex engineering ensures even pressure and full coverage. This eliminates common post-installation issues.
Long-Term Durability
Premium materials maintain performance longer. Good installation techniques maximize this built-in quality.
Comprehensive Support
Topex provides guides and fitment help. This gives you confidence throughout the process.
| Topex + Right Tools Benefit | Installation Advantage | Long-Term Result |
|---|---|---|
| Reliable adapters | Secure click with basic tools | No loose blades |
| Durable materials | Forgives minor handling errors | Longer overall life |
| Precise engineering | Perfect fit every time | Streak-free performance |
| Quiet operation | Smooth from first use | Comfortable driving |
This table demonstrates the advantages clearly. Quality and preparation together create excellent outcomes.
My Installation Comparison
When testing Topex versus standard blades with the same tools, Topex installed faster and performed better immediately after placement.
Customer and Fleet Results
Many first-time DIYers succeed on their first try with Topex blades. Fleets report fewer comebacks and longer service intervals.
The right combination makes replacement reliable. Take action now.
Ready to Replace Your Wiper Blades Like a Pro? Here’s Your Next Step?
You have the knowledge, tools list, and steps. The only thing left is to gather what you need and complete the job.
Ready to replace your wiper blades like a pro? Gather the basic tools, choose quality blades, and follow the steps for perfect results.
Start today and enjoy clearer, safer driving immediately.
Conclusion
Replacing your wiper blades is a simple DIY job that most car owners can complete in under 10 minutes — but having the right tools makes the difference between a quick success and a frustrating experience. Proper preparation and the correct tools help you avoid damaging your new blades or windshield.
TOPEX wiper blades are designed for easy installation with reliable adapters, so when paired with basic tools and the right technique, you get professional-level results at home.
Don’t drive with bad wipers any longer. Gather the right tools and replace them today for clearer, safer driving.
Frequently Asked Questions About DIY Wiper Blade Replacement
What basic tools do I need for DIY wiper blade replacement?
You need a clean towel to protect the windshield, microfiber cloths, mild soap and water, and optionally a flathead screwdriver. These basic items are usually enough for most vehicles.
Can I replace wiper blades without any special tools?
Yes. Most modern vehicles require no special tools. A towel for protection and your hands are often sufficient when you follow the correct technique.
How long does it take to replace wiper blades at home?
The entire process usually takes 5 to 10 minutes for both sides once you have the tools ready and know the steps. The first time may take a few minutes longer as you learn.
Do I need different tools for beam vs conventional wiper blades?
No. The basic tools remain the same. Beam blades often click in more easily while some conventional styles may need a screwdriver for the retainer clip.
Is it safe to replace wiper blades myself?
Yes. It is a safe and straightforward job when you support the arms properly and use a towel for protection. Millions of drivers do this successfully every year.
What should I do if the new wiper blade won’t click into place?
Check the adapter orientation, make sure you have the correct size, and clean the arm connection. Gently realign and press until you hear the click. Do not force it.

--- END ---


