
Wiper Blade Connector Types Explained: How to Choose the Right Fit
Oct 22, 2026
Finding a replacement wiper blade with the correct length does not guarantee that it will fit the vehicle. The blade must also connect securely to the wiper arm, sit at the correct angle, and move through its complete wiping path without becoming loose or contacting surrounding components.
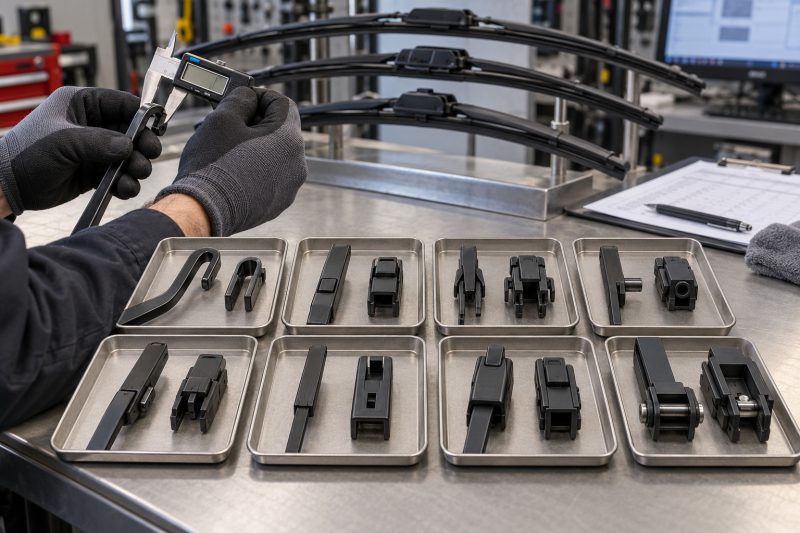
Connector selection has become more complicated as vehicle manufacturers have adopted push-button, pinch-tab, side-pin, bayonet, top-lock, side-lock, and other application-specific systems. Even connectors carrying the same general name may use different widths, diameters, or locking mechanisms.
Choosing the correct wiper blade connector requires verified vehicle application data and physical confirmation of the original arm. Buyers should check the vehicle year, market, blade position, arm shape, connector dimensions, release mechanism, and required adapter—not simply rely on blade length or a broad “universal” claim.
I am Jacky Huang, CEO of Xiamen TOPEX Auto Parts Co., Ltd. In my experience with wiper blade development, fitment data, product testing, and B2B supply programs, connector errors are among the most avoidable causes of failed installations and product returns. Accurate identification protects both vehicle safety and aftermarket profitability.
Why the Right Blade Length Can Still Result in the Wrong Fit
Wiper blade length and connector compatibility are separate fitment requirements. A 24-inch blade designed for a J-hook arm cannot automatically replace a 24-inch blade using a push-button or side-lock connection.
The blade may be dimensionally correct but still fail to attach, sit incorrectly, or lock securely.
The Connector Transfers Force to the Blade
The connector is not merely a mounting accessory. It transfers the arm’s movement and pressure into the blade. It also maintains the blade’s orientation as the arm changes direction.
A correctly installed connector should:
- Match the arm’s physical dimensions
- Slide or engage in the intended direction
- Lock without excessive force
- Hold the blade at the correct angle
- Resist movement inside the adapter
- Remain secure during the complete wiping cycle
- Permit removal according to the instructions
If these conditions are not met, the blade may chatter, twist, detach, or distribute pressure incorrectly.
A Connector Can Attach Without Fitting Correctly
One of the most dangerous errors occurs when an adapter appears to connect but does not fully lock. The blade may remain on the arm while the vehicle is parked and then move or separate during operation.
Warning signs include:
- The adapter does not produce the expected click or locking movement.
- The blade slides along the arm after installation.
- The connector cover does not close completely.
- The blade sits at an unusual angle.
- The arm contacts the blade body.
- The adapter flexes excessively during a gentle pull test.
- The blade releases without using the intended release mechanism.
Never use tape, cable ties, adhesive, or improvised modifications to secure an incompatible blade.
Driver, Passenger and Rear Connections May Differ
The front blades commonly share an arm family, but this should not be assumed. Some vehicles use different dimensions, adapters, or blade constructions by position.
Rear blades frequently use compact vehicle-specific connections that have little in common with the front system. The rear application therefore requires a separate lookup.
| Fitment element | What must be confirmed | Risk if incorrect |
|---|---|---|
| Blade length | Correct dimension for each position | Reduced coverage or interference |
| Connector family | Correct arm-interface design | Blade cannot be installed |
| Connector size | Width, pin diameter, or hook dimensions | Loose or incomplete locking |
| Adapter code | Correct component from the adapter set | Wrong angle or insecure attachment |
| Installation orientation | Correct insertion direction | Damaged or reversed connector |
| Blade position | Driver, passenger, or rear | Incorrect product selection |
| Arm and blade clearance | Free movement through the complete sweep | Contact with trim or another blade |
A complete fitment record should connect all these fields to the correct vehicle application.
The Connector Identification Mistakes Buyers Commonly Make
Connector names are useful for organizing products, but they are not always specific enough to approve an application. A buyer who identifies an arm as “push button” has only completed the first part of the process.
Identifying by Appearance Alone
Two connectors may look similar in a photograph while using different dimensions or locking systems. Push-button arms, for example, can differ in width. J-hooks may use different hook dimensions or orientations. Side-pin systems can use different pin diameters and supporting features.
Photographs should therefore be combined with application data and physical measurements.
Confusing J-Hook Variations
J-hook and U-hook are generally names for the same curved-arm family. However, the family includes important variations, such as:
- 9 × 3 mm hook
- 9 × 4 mm hook
- Short-hook arrangements
- Reverse-hook configurations
- Different arm thicknesses
- Adapters intended for specific blade bodies
An adapter may accept one hook but not another. Forcing the arm into a narrow or incorrectly shaped channel can damage the adapter or prevent the locking tab from engaging.
Treating Every Push Button as Identical
Push-button connectors are commonly found on modern beam and OE-style blades. The arm enters the connector, and a button or locking feature engages with an opening.
The term covers more than one width and design. The button position, arm profile, connector cover, and release method may also differ. Buyers should confirm the exact specification rather than selecting any package marked “push button.”
Assuming “Universal” Means Every Vehicle
The word “universal” often refers to broad coverage within a defined group of wiper arms. It does not mean that one blade fits every passenger vehicle, commercial vehicle, and rear-wiper system.
A multi-fit blade may include several adapters, but its catalogue must still specify:
- Supported arm types
- Connector dimensions
- Vehicle applications
- Blade positions
- Included adapter codes
- Installation procedures
- Known exclusions
If the required connector variation is not listed, the blade should not be treated as compatible.
Reusing Front Fitment Data for Rear Blades
Rear-wiper arms often use integrated plastic connectors or dedicated locking profiles. A short front blade of the same length may not fit the rear arm.
Common identification errors include:
- Selecting by rear blade length alone
- Ignoring the integrated rear-arm design
- Confusing two production generations
- Using data from another regional vehicle version
- Listing one rear blade for every trim or body style
- Assuming a multi-fit front adapter covers the rear position
These errors can generate returns even when the product itself has no manufacturing defect.
How to Identify the Most Common Wiper Blade Connector Types
The safest identification method combines vehicle application data with inspection of the original wiper arm. Buyers should look at the arm end after the blade has been placed in its service position, following the vehicle manufacturer’s instructions.
J-Hook or U-Hook
A J-hook arm curves back toward itself at the end, forming a hook. The blade adapter normally contains a channel that receives the hook and a locking tab that secures it.
J-hook is widely used, but its dimensions and orientation still require confirmation.
Identification points include:
- Curved metal arm end
- Open hook profile
- Adapter channel around the hook
- Locking tab or internal catch
- Possible 9 × 3 mm or 9 × 4 mm variation
Push Button
A push-button arm normally has a straight, flat end and a button or tab that locks into the blade connector. Removal usually requires pressing the button while sliding the blade in a specified direction.
Check:
- Arm width
- Button position
- Connector opening
- Cover or locking arrangement
- Direction of insertion and removal
Do not assume that all push-button arms share the same width.
Pinch Tab
A pinch-tab arm uses two side tabs that must be pressed during installation or removal. The connector body typically surrounds the end of the arm and locks around these tabs.
The tabs should engage symmetrically. If one side remains raised, the connector may not be fully secured.
Side Pin
A side-pin arm has a pin projecting horizontally from the side of the arm. The pin enters a corresponding hole or channel in the adapter.
Confirm:
- Pin diameter
- Pin length
- Supporting arm profile
- Required retaining feature
- Correct blade orientation
A connector that accepts the pin but leaves excessive movement should not be approved.
Side Lock
Side-lock systems generally use a flat arm that engages the blade from the side. A locking feature prevents the blade from sliding back out.
Side lock can be confused with side pin or some top-lock systems when viewed from an incomplete angle. The original blade should be examined before removal whenever possible.
Bayonet
A bayonet arm is typically a narrow, straight metal arm that slides into the blade adapter. A tab, screw, or locking feature holds it in position.
Bayonet connectors can vary in width and locking method. Buyers should not identify them from the straight-arm appearance alone.
Top Lock
Top-lock arms use a flat arm and a locking feature positioned toward the top of the connector. Different widths and variations are available, including designs that may resemble push-button systems.
The exact adapter and application record should determine compatibility.
Saddle Connectors
Saddle-type connectors are often associated with trucks, buses, RVs, and other commercial or specialty vehicles. Their arm and attachment systems can be larger and structurally different from passenger-car connectors.
Commercial applications may also use:
- Screws or bolts
- Wide saddle mounts
- Heavy-duty pins
- Pantograph systems
- Paired blades
- Dedicated arm-and-blade assemblies
These products require system-level verification rather than comparison with passenger-car adapters.
| Connector family | Main visual feature | Critical item to verify |
|---|---|---|
| J-hook/U-hook | Curved hook-shaped arm end | Hook width, thickness, and orientation |
| Push button | Straight arm with locking button | Arm width and button position |
| Pinch tab | Tabs on both sides of the arm | Tab engagement and connector dimensions |
| Side pin | Horizontal pin projecting from the arm | Pin diameter and retention |
| Side lock | Arm engages from the side | Locking direction and profile |
| Bayonet | Narrow straight arm end | Width and locking method |
| Top lock | Locking feature above a flat arm | Connector width and design variation |
| Saddle | Wide or heavy-duty mounting arrangement | Commercial-vehicle specification |
The TOPEX guide to wiper blade connection types provides additional guidance for buyers comparing common arm and adapter systems.
Multi-Fit Adapters vs. OE Exact-Fit Connectors: Which Is Better?
Multi-fit and OE exact-fit systems address different commercial requirements. Neither option is automatically better for every distributor, retailer, workshop, or vehicle.
How Multi-Fit Adapter Systems Work
A multi-fit blade uses one blade platform with several interchangeable or integrated adapters. The system can serve multiple arm types without requiring a completely separate blade body for every connector.
For distributors, the main advantages can include:
- Fewer base blade platforms
- Broader coverage from core sizes
- Reduced warehouse complexity
- More efficient mixed-SKU purchasing
- Easier expansion into additional applications
- Lower inventory exposure for some connectors
The TOPEX flat wiper blade range includes products for different adapter and market requirements. Coverage should still be verified against the distributor’s important local vehicles.
Multi-fit systems also introduce risks:
- Customers may select the wrong adapter.
- Instructions may not distinguish similar connectors clearly.
- Extra components can be lost.
- The adapter may create a higher visual profile.
- Broad coverage claims may not reflect physical vehicle testing.
- Retail staff may need additional installation training.
A multi-fit system succeeds when adapter selection is simple, the application data is accurate, and installation guidance is clear.
How OE Exact-Fit Connectors Work
An OE exact-fit blade is designed around a specific arm family or application. The connector is normally integrated into the product or supplied in a dedicated configuration.
Its potential advantages include:
- More direct installation
- Fewer adapter-selection decisions
- A profile closer to the original blade
- Clear vehicle-specific positioning
- Lower installation uncertainty for verified applications
- Reduced risk of unused adapters inside the package
Exact fit does not necessarily mean that the blade is a genuine automaker-branded OEM component. In the aftermarket, the term generally describes an application-specific connection and product configuration.
Its commercial limitations can include:
- More SKUs required for broad coverage
- Greater dependence on accurate vehicle data
- Higher long-tail inventory exposure
- More packaging and catalogue records
- Additional forecasting complexity
Which System Should a Distributor Choose?
| Business requirement | Multi-fit system | OE exact-fit system |
|---|---|---|
| Broad baseline coverage | Strong advantage | Requires more individual products |
| Low SKU count | Usually more efficient | Usually less efficient |
| Direct installation | Depends on adapter selection | Often simpler |
| OE-style appearance | May have a larger adapter profile | Usually closer to original design |
| Vehicle-specific marketing | Possible with good data | Natural strength |
| Inventory for uncommon vehicles | Can reduce exposure | May create slow-moving SKUs |
| Customer training | More important | Often less complex |
| Fitment-data requirement | High | Very high |
| Packaging complexity | Multiple adapters and instructions | More product-specific packages |
In many markets, the most effective strategy is a combined range. Verified multi-fit blades provide broad coverage, while OE exact-fit products serve popular vehicles whose specialized connections justify dedicated inventory.
The TOPEX hybrid wiper blade range provides another option for buyers building product lines around different structures, connector requirements, and market positions.
A Final Connector Check Before Installation and Road Use
Connector selection should be confirmed before the original blade is removed whenever possible. After installation, the blade must be physically checked before the vehicle is driven.
Confirm the Vehicle Application
Record the following information:
- Sales country or region
- Vehicle make and model
- Model year
- Generation or production period
- Body style or variant
- Left- or right-hand-drive configuration
- Driver, passenger, or rear position
- Blade length
- Arm and connector type
- Required adapter code
Vehicles sharing a model name may use different connections across generations or regional versions.
Inspect and Measure the Original Arm
Photograph the original connector from the top, side, and underside. Observe how it releases and how the arm engages the blade.
Where necessary, measure:
- Hook width and thickness
- Flat-arm width
- Pin diameter
- Pin length
- Button position
- Connector channel dimensions
Do not remove an original blade until the correct installation procedure is understood. Some vehicles require the wipers to be placed in a service position before the arms can be lifted.
Install the Correct Adapter
Follow the product instructions in the correct sequence. An adapter should not require cutting, bending, drilling, or excessive force.
A practical installation process is:
- Confirm the blade position and length.
- Identify the original arm connection.
- Select the specified adapter.
- Align the adapter in the required direction.
- Slide or press it into place as instructed.
- Confirm that the locking feature engages.
- Close any connector cover completely.
- Apply a gentle pull in the removal direction.
- Lower the blade carefully onto the glass.
- Repeat the process for the other positions.
Protect the windshield while the blade is removed. A bare metal arm can damage the glass if it snaps back.
Complete a Wet-Windshield Test
Wet the windshield before operating the wipers. Observe several cycles at normal and higher wiping speeds.
Confirm that:
- The connector remains fully locked.
- The blade does not slide inside the adapter.
- The blade stays in the correct orientation.
- The arm does not contact the blade body.
- Both front blades move without touching each other.
- The blade remains inside the windshield boundary.
- The rubber maintains contact through the complete sweep.
- No repeated streaking, skipping, chatter, or missed area appears.
- The blades return to the correct parked position.
Stop the system immediately if a connector becomes loose, rotates abnormally, or contacts another component. Recheck the vehicle application and adapter rather than forcing the installation.
Conclusion
Choosing the correct wiper blade connector is just as important as selecting the correct blade length. Connector families such as J-hook, push button, pinch tab, side pin, bayonet, and side lock often include multiple sizes or locking variations that are not interchangeable.
Buyers should use verified vehicle application data and compare the original arm’s shape, dimensions, and release mechanism before installation. Multi-fit blades can simplify inventory, but only when their adapter system explicitly covers the required arm specification. OE exact-fit blades provide a more direct replacement but demand accurate fitment data.
After installation, confirm that the connector is fully locked and test the blade on a wet windshield before driving. A secure connection should remain stable through the complete sweep while maintaining the correct blade angle, glass contact, and clearance.
Frequently Asked Questions About Wiper Blade Connectors
How do I identify my vehicle’s wiper blade connector type?
Use a verified application catalogue based on the vehicle’s year, make, model, region, and blade position. Then inspect the original arm and compare its shape, dimensions, and release mechanism with the product instructions. Photographs from several angles can help distinguish visually similar systems.
What is the difference between J-hook and U-hook connectors?
J-hook and U-hook generally describe the same curved-arm connector family. The names refer to the shape of the arm end. However, hooks may use different dimensions, such as 9 × 3 mm and 9 × 4 mm, as well as short-hook or reverse-hook variations. The exact adapter specification must still be confirmed.
Are all push-button wiper connectors the same size?
No. Push-button connectors are available in different widths and locking configurations. Button position, arm profile, connector cover, and release method may also vary. A blade labelled for one push-button design should not be assumed to fit every push-button arm.
Do universal wiper blades fit every type of wiper arm?
No. “Universal” normally means that a product covers a stated group of common applications through one or more adapters. It does not guarantee compatibility with every front, rear, passenger-car, or commercial-vehicle arm. Check the exact connector variation and vehicle listing before purchase.
Are OE exact-fit connectors better than multi-fit adapters?
They offer different advantages. OE exact-fit connectors usually provide more direct installation and a profile closer to the original blade. Multi-fit adapters can cover more vehicles with fewer base SKUs. The better choice depends on verified fitment, customer needs, inventory strategy, and installation support.
How can I tell whether a new wiper blade is securely locked?
The connector should engage according to the instructions, often with an audible or physical click. The cover should close completely, and the blade should resist a gentle pull in the removal direction. It should remain correctly oriented during a wet-windshield test without sliding, twisting, or separating from the arm.

--- END ---


